A strong foundation determines how well your paved surface holds up over time. Proper ground preparation ensures stability, prevents shifting, and extends the lifespan of your project. Whether you’re a homeowner or contractor, understanding depth requirements and soil composition is essential for success.
Every project starts with evaluating the site. Measuring the minimum depth needed helps avoid future issues like cracking or sinking. Soil type also plays a role—clay-heavy ground may need more adjustments than sandy terrain. Debris removal and leveling create a clean slate for the next steps.
PAR’s Services Ltd emphasizes precision during this phase. Our team at +(604) 278-4445 uses industry standards to calculate exact measurements. A well-prepared bedding layer ensures proper drainage and support for pavers. This attention to detail saves time and costs in the long run.
Key Takeaways
- Accurate ground preparation prevents structural issues later.
- Soil analysis determines how deep you need to dig.
- Clearing debris thoroughly improves base stability.
- Proper depth measurements vary based on materials used.
- Expert guidance ensures compliance with local standards in Canada.
Introduction to Excavation for Driveway Installation Projects
Quality paving projects start with meticulous attention to subsurface details. Proper ground preparation determines how well materials like pavers withstand weather, weight, and wear over decades. Three elements form the foundation of success: a stable base, compatible soil conditions, and precise depth measurements.
Core Components of a Durable Surface
Understanding these elements helps prevent common issues:
| Element | Purpose | Common Materials |
|---|---|---|
| Base Layer | Load Distribution | Crushed Gravel |
| Bedding Sand | Paver Alignment | Washed Concrete Sand |
| Edge Restraints | Prevent Shifting | Plastic or Metal |
Why Precision Matters
PAR’s Services Ltd prioritizes site analysis to avoid future repairs. Soil testing reveals compaction needs, while accurate depth calculations ensure proper drainage. Skipping these steps often leads to uneven surfaces or cracked pavers within two years.
Securing local permits and marking underground utilities prevents costly delays. Our team combines laser-guided tools with Canadian climate knowledge to create surfaces that last. As one project manager notes: “A 2-inch variance in base depth can reduce pavement lifespan by 40%.”
Planning Your Excavation Project in Canada

A well-structured plan is the backbone of any successful construction project. Before breaking ground, focus on three priorities: precise layout marking, permit compliance, and adaptable scheduling. These steps ensure smooth execution while meeting Canadian regulatory standards.
Marking the Layout and Securing Permits
Begin by outlining the work area with wooden stakes and brightly colored string. This visual guide ensures accuracy when machinery arrives. Always contact your municipal office to confirm permit requirements—most regions in Canada mandate approvals for digging deeper than 24 inches.
Key considerations include:
- Utility line locations (gas, water, electrical)
- Property boundary verification
- Depth adjustments for frost-prone areas
Setting a Realistic Timeline and Budget
Allocate 15-20% extra time for weather delays common in provinces like Alberta or Quebec. Material costs fluctuate based on layer thickness—crushed stone bases often require 6-8 inches for stability. A detailed budget should account for:
| Factor | Impact | Solution |
|---|---|---|
| Soil Type | Affects digging speed | Add 1-2 days for clay |
| Project Size | Material quantities | Measure twice, order once |
| Equipment Access | Space limitations | Opt for compact machinery |
Proper planning reduces rework risks by 65%, according to industry surveys. For complex projects, consult local experts to navigate zoning bylaws and material specifications efficiently.
Excavation For Driveway Installation Guide
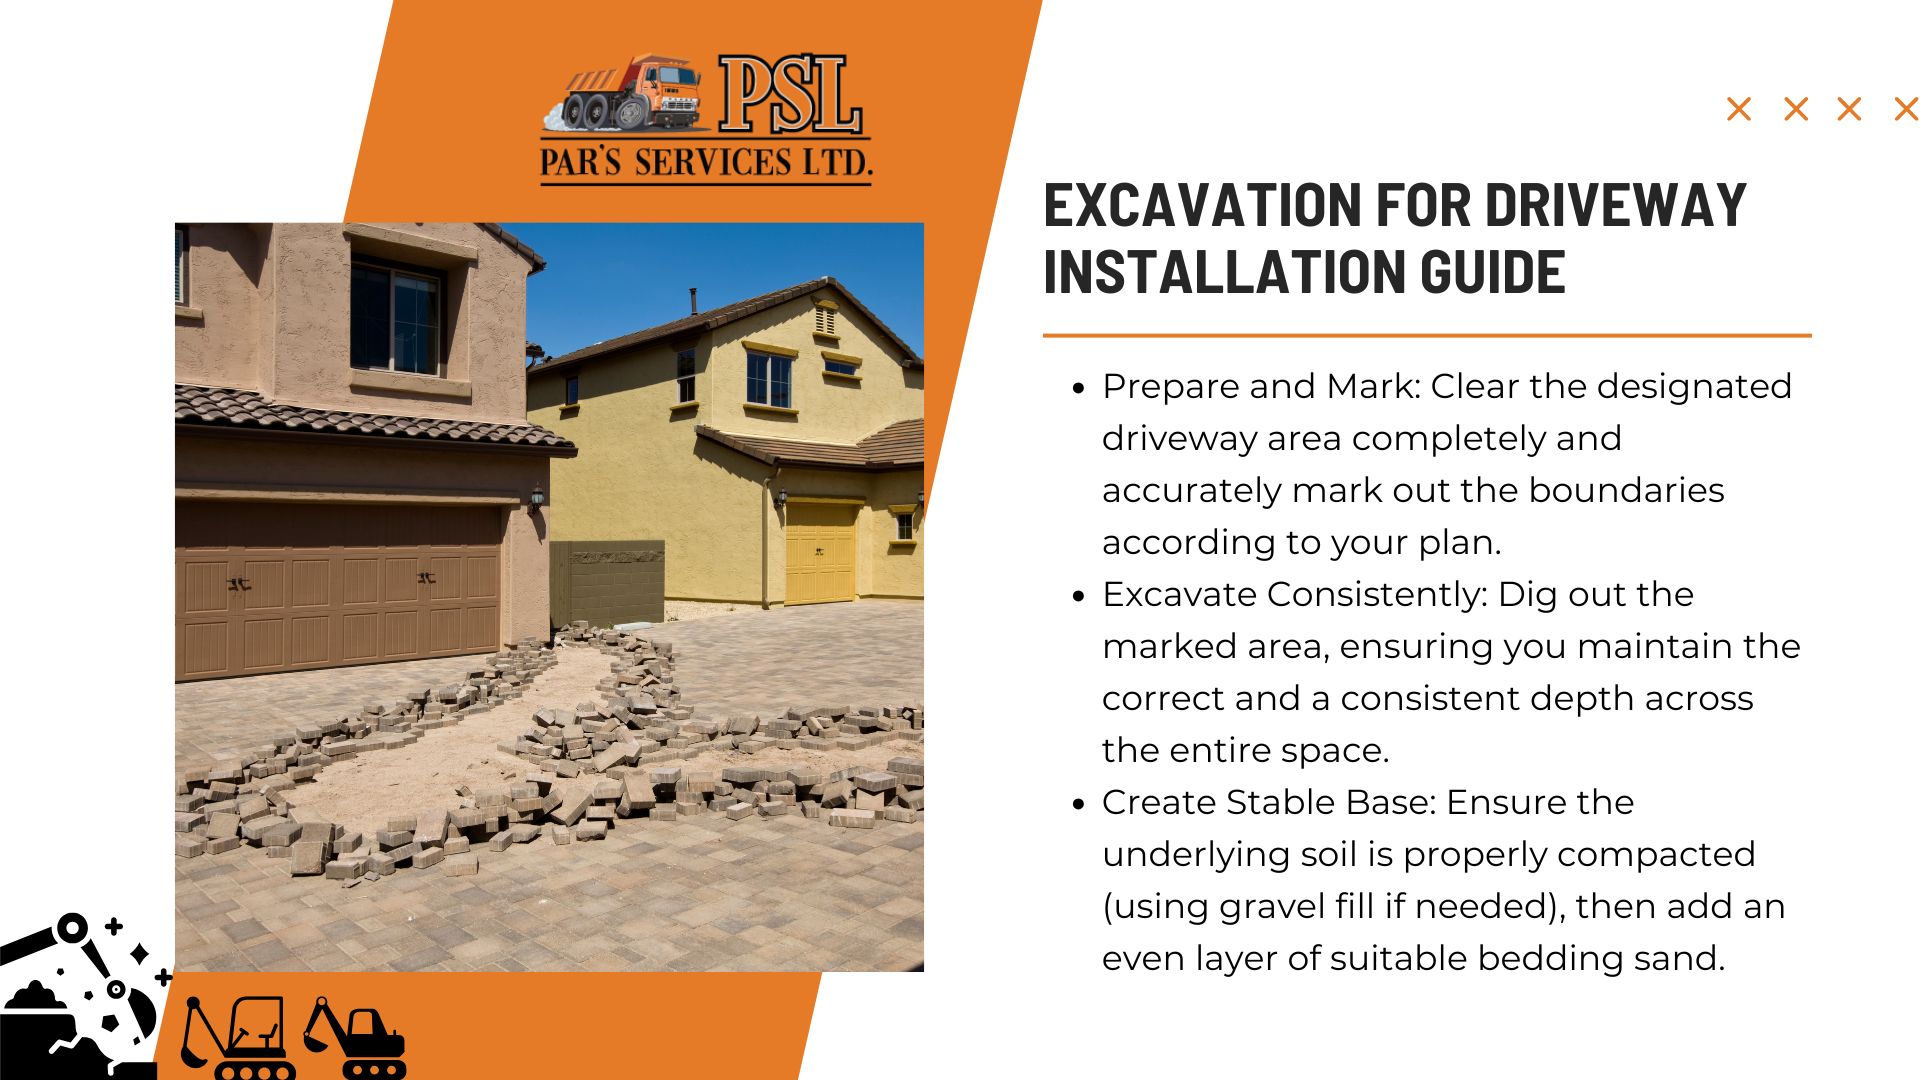
A methodical approach transforms complex projects into manageable tasks. PAR’s Services Ltd recommends aligning each phase with your property’s unique needs to ensure structural integrity. Start by visualizing the final layout—this design phase determines material quantities and workflow efficiency.
Step-by-Step Process for a Successful Project
Follow this sequence to create a stable base:
| Stage | Key Actions | Materials |
|---|---|---|
| 1. Site Prep | Clear debris, mark boundaries | Stakes, string |
| 2. Depth Check | Measure across entire area | Laser level |
| 3. Soil Adjustments | Compact or replace unstable layers | Gravel base |
| 4. Sand Bedding | Spread evenly, moisten slightly | Washed concrete sand |
Allocate sufficient time for each stage. Rushing soil compaction creates weak spots, while delayed sand placement leads to uneven settling. PAR’s team uses grid-based measurements to maintain consistency in sloped or irregularly shaped spaces.
For home projects, consider traffic patterns during the design phase. A curved layout might enhance curb appeal but requires precise angle calculations. Proper sand depth (1-1.5 inches) allows pavers to lock securely without shifting under weight.
One client reduced post-installation repairs by 70% after following this timeline-driven process. As PAR’s lead engineer notes: “Measure three times, dig once—it’s cheaper than fixing mistakes later.”
Assessing Soil Type, Depth, and Base Materials
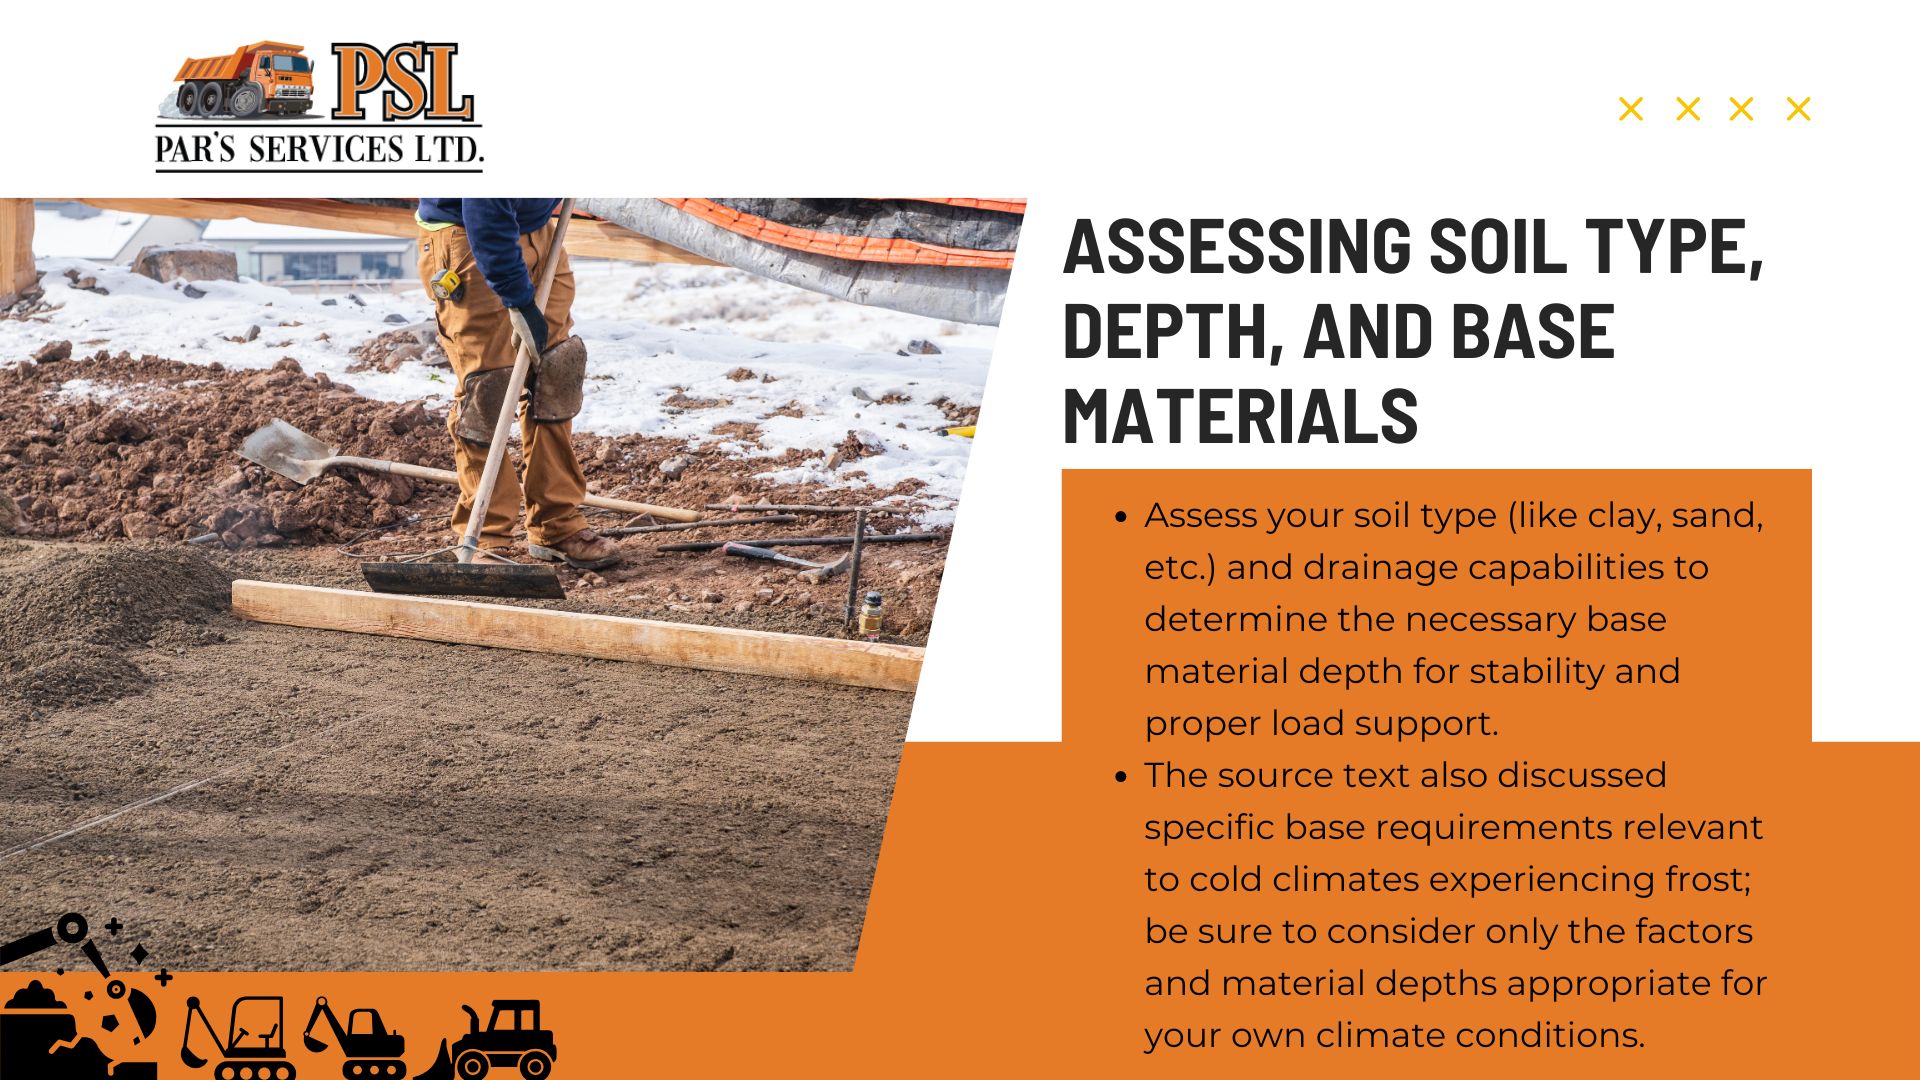
Soil composition directly impacts the longevity of paved surfaces. Identifying your ground characteristics helps select materials that combat erosion, frost heave, and settling. PAR’s Services Ltd stresses this evaluation as the first critical step in any project.
Evaluating Different Soil Conditions
Clay retains water, increasing freeze-thaw risks in Canadian winters. Sandy soils drain quickly but lack stability. Loamy mixtures often need reinforcement. Perform these tests:
- Squeeze test: Mold damp soil to check cohesion
- Percolation rate: Measure water absorption speed
- Compaction analysis: Assess load-bearing capacity
Poor drainage requires thicker gravel layers or French drains. Remove roots and debris to prevent future sinkholes.
Determining the Ideal Depth and Layer Composition
Base depth varies by material weight and soil type. Heavy vehicular areas need 10-12 inches of crushed stone, while pedestrian zones use 6-8 inches. Compare options:
| Material | Best For | Base Depth |
|---|---|---|
| Concrete | High-traffic zones | 4-6 inches |
| Crushed Stone | Frost-prone regions | 8-12 inches |
| Recycled Aggregate | Eco-friendly projects | 10-14 inches |
Layer thickness affects drainage efficiency. PAR’s team recommends geotextile fabric under bases in wet climates. As one technician notes: “A 30% slope increases gravel depth requirements by 25% to prevent washouts.”
Equipment, Safety, and Utility Considerations

Prioritizing safety and efficiency reduces risks while keeping projects on track. Before any work begins, thorough preparation ensures compliance with Canadian regulations and protects both workers and infrastructure. PAR’s Services Ltd emphasizes three non-negotiable steps: utility checks, equipment inspections, and crew training.
Locating Buried Utilities and Securing Permits
Contact local utility providers to mark gas, water, and electrical lines. In Canada, dialing 811 triggers a free service that identifies underground hazards within 48 hours. Always secure municipal permits—required for projects exceeding 1.2 meters in depth.
Key preparation steps include:
- Reviewing property blueprints for hidden septic systems
- Using ground-penetrating radar in older neighborhoods
- Adjusting timelines for permit approval delays
Implementing Safety Measures and Choosing the Right Equipment
Inspect machinery daily for hydraulic leaks or tire damage. Compact excavators suit tight spaces, while larger backhoes handle rocky terrain. Match equipment to your project’s needs:
| Project Size | Recommended Machinery | Safety Gear |
|---|---|---|
| Small (0-500 sq ft) | Mini excavator | Hard hats, steel-toe boots |
| Medium (500-1500 sq ft) | Skid-steer loader | High-vis vests, ear protection |
| Large (1500+ sq ft) | Tracked backhoe | Dust masks, rollover bars |
Stability starts with quality gravel layers. PAR’s team uses ¾-inch crushed stone for optimal load distribution. Noise barriers and scheduled breaks minimize community disruptions. As one safety officer notes: “A $50 inspection prevents $5,000 in repair costs.”
Installation Best Practices and Layering Techniques
Proper layering transforms raw materials into a lasting surface. PAR’s Services Ltd combines technical precision with material science to create foundations that withstand Canada’s freeze-thaw cycles. Three factors define success: granular base quality, compaction consistency, and debris-free workspaces.
Building a Stable Foundation
Follow these steps for optimal results:
- Clear all organic matter and debris using rakes or mechanical sweepers
- Spread crushed gravel in 2-inch layers, checking depth with laser levels
- Compact each layer using plate compactors (4-6 passes minimum)
- Apply bedding sand, mist lightly, then screed evenly
Material Selection and Surface Perfection
Choose materials based on load requirements and landscape design goals:
| Material Type | Best Use | Compaction Effort |
|---|---|---|
| ¾” Crushed Stone | Vehicle Areas | High (90% density) |
| Concrete Sand | Paver Alignment | Medium |
| Granite Screening | Decorative Paths | Low |
PAR’s technicians achieve 98% compaction rates using vibratory rollers—exceeding Canadian standards. “Uneven surfaces often trace back to rushed sand leveling,” notes a project manager. Final checks include running a straightedge across the entire area to detect ¼-inch deviations.
Matching layer thickness to your landscape’s contours prevents water pooling. A well-executed base enhances curb appeal while reducing long-term maintenance by up to 60%.
Proper Drainage, Sand, and Edge Restraints for Stability
Effective water management forms the cornerstone of durable paved surfaces. Without proper drainage, even the strongest materials succumb to erosion and shifting. PAR’s Services Ltd integrates advanced drainage planning into every project to protect against Canada’s harsh weather patterns.
Managing Drainage to Prevent Water Pooling
Sloped channels and perforated pipes redirect runoff away from critical areas. For driveways, a 1-2% slope ensures water flows toward storm drains or landscaped zones. Compacted gravel beneath the bedding layer enhances absorption while preventing soil saturation.
Common things that compromise drainage include:
- Clogged filter fabric around pipes
- Inadequate slope calculations
- Poorly compacted base layers
Edge restraints lock pavers in place, reducing lateral movement. Plastic or metal borders installed ¼-inch below the surface maintain alignment. PAR’s team tests drainage efficiency by simulating heavy rainfall before finalizing projects.
Tailored solutions account for regional factors like snowfall in Alberta or coastal rains in British Columbia. Proper planning extends the life of paved areas by 15-20 years. As one PAR technician notes: “Water damage repairs cost three times more than installing quality drainage upfront.”
Partnering with PAR’s Services Ltd for Expert Results
Trusted partnerships deliver lasting results in construction projects. PAR’s Services Ltd combines technical expertise with accredited industry practices to transform complex plans into flawless execution. Clients across Canada choose our team to navigate challenging elements like soil variability and municipal regulations.
Why Choose Our Professional Excavation Services
We address common questions about timelines, material costs, and site preparation through transparent communication. Our process includes:
- Accredited technicians with 15+ years of local experience
- Precision management of every project stage
- Laser-guided height measurements for slope consistency
| DIY Risks | PAR’s Solutions | Outcome |
|---|---|---|
| Uneven perimeter | Survey-grade alignment tools | Flawless edges |
| Soil instability | Geotechnical analysis | Optimal base depth |
| Permit delays | Full regulatory compliance | On-time completion |
Proper height differentials between layers prevent water pooling. We monitor material compaction rates and perimeter integrity daily. One recent client avoided $8,500 in repairs through our proactive quality checks.
Contact Us Today at +(604) 278-4445
Discuss your project’s unique elements with our specialists. From initial stage planning to final inspections, we provide end-to-end support tailored to Canadian climates. Call now for a free site evaluation and cost estimate.
Conclusion
Successful outdoor projects depend on balancing technical precision with creative design. Following a structured process—from soil analysis to final adjustments—ensures surfaces remain stable through Canadian winters and heavy use. Choosing the right pavers desired pattern enhances both curb appeal and structural resilience.
Proper laying pavers techniques prevent shifting, while quality edge restraints lock materials in place. Each step matters: accurate measurements, debris removal, and compacted base layers create foundations that last decades. Rushing these stages often leads to costly repairs within two years.
PAR’s Services Ltd combines local expertise with advanced tools to streamline every phase. Our team ensures patterns align perfectly and restraints meet load requirements. Homeowners gain peace of mind knowing their investment withstands weather extremes and daily wear.
Ready to transform your property? Call PAR’s Services Ltd at +(604) 278-4445 for tailored solutions. Let our professionals handle permits, material selection, and precision laying pavers—guaranteeing results that balance beauty and durability.